Thursday, May 9, 2019

Facebook Authentication(OAuth2.0) with SpringBoot


In this example, we will be creating SpringBoot sample application which facilitate to authenticate through Facebook. In order to replicate the scenario, I’m using OAuth2.0 Authorization Code grant type.

As first step, create a Facebook Application using developer account and get the App Id and the App Secret.

  • Login to Facebook developer account - Click here to login.
  • Goto My Apps and create new application by providing Display name and Email address.

  •  You have to validated the security check if provided.

  • Once application is created, navigate to Setting > basic to get App Id and App Secret.

  • Also please verify “Client OAuth Login” and “Web OAuth Login” has enabled as shown below.


Now we have successfully configured Facebook application.

Then we need to create SpringBoot sample application as shown below.


  • Create SpringBoot initial project with mail class.
  • Define the pom.xml as shown below. Make sure to add the “spring-social-facebook” dependency.
<?xml version="1.0" encoding="UTF-8"?>
<project xmlns="http://maven.apache.org/POM/4.0.0" xmlns:xsi="http://www.w3.org/2001/XMLSchema-instance"
xsi:schemaLocation="http://maven.apache.org/POM/4.0.0 http://maven.apache.org/xsd/maven-4.0.0.xsd">
<modelVersion>4.0.0</modelVersion>

<groupId>com.samle</groupId>
<artifactId>spring-boot-social-login</artifactId>
<version>0.0.1-SNAPSHOT</version>
<packaging>jar</packaging>

<name>spring-boot-social-login</name>
<description>Demo project for Spring Boot to Authenticate with Facebook OAuth</description>

<parent>
<groupId>org.springframework.boot</groupId>
<artifactId>spring-boot-starter-parent</artifactId>
<version>1.4.1.RELEASE</version>
<relativePath /> 
</parent>

<properties>
<project.build.sourceEncoding>UTF-8</project.build.sourceEncoding>
<project.reporting.outputEncoding>UTF-8</project.reporting.outputEncoding>
<java.version>1.8</java.version>
</properties>

<dependencies>
<dependency>
<groupId>org.springframework.boot</groupId>
<artifactId>spring-boot-starter-web</artifactId>
</dependency>
<dependency>
<groupId>org.springframework.boot</groupId>
<artifactId>spring-boot-starter-test</artifactId>
<scope>test</scope>
</dependency>
<dependency>
<groupId>org.apache.tomcat.embed</groupId>
<artifactId>tomcat-embed-jasper</artifactId>
</dependency>
<dependency>
<groupId>javax.servlet</groupId>
<artifactId>jstl</artifactId>
</dependency>
<dependency>
<groupId>org.springframework.social</groupId>
<artifactId>spring-social-facebook</artifactId>
<version>2.0.3.RELEASE</version>
</dependency>
</dependencies>

<build>
    <plugins>
        <plugin>
            <groupId>org.springframework.boot</groupId>
            <artifactId>spring-boot-maven-plugin</artifactId>
            <executions>
                <execution>
                    <goals>
                        <goal>repackage</goal>
                    </goals>
                </execution>
            </executions>
        </plugin>
        </plugins>
        </build>
</project>


  • Next, we will be defining the Controller. In this controller, we are using the FacebookConnectionFactory provided by the Spring Facebook Social. we are makeing OAuth call to Facebook to get the Auhtorization Code and then obtain the Access Token using this plugin.
NOTE : Make Sure to provide Facebook App ID and App Secret for connection factory as shown below.
private FacebookConnectionFactory factory = new FacebookConnectionFactory("<App ID>","<App Secret>");

 package com.samle.controllers;
import org.springframework.social.connect.Connection;
import org.springframework.social.facebook.api.Facebook;
import org.springframework.social.facebook.api.User;
import org.springframework.social.facebook.connect.FacebookConnectionFactory;
import org.springframework.social.oauth2.AccessGrant;
import org.springframework.social.oauth2.OAuth2Operations;
import org.springframework.social.oauth2.OAuth2Parameters;
import org.springframework.stereotype.Controller;
import org.springframework.web.bind.annotation.GetMapping;
import org.springframework.web.bind.annotation.RequestMapping;
import org.springframework.web.bind.annotation.RequestParam;
import org.springframework.web.servlet.ModelAndView;
@Controller
public class SocialFacebookController {
private FacebookConnectionFactory factory = new FacebookConnectionFactory("425636574880198",
"xxxxxxxxxxxxxxxxxx");
@RequestMapping("/")
public ModelAndView firstPage() {
return new ModelAndView("welcome");
}
@GetMapping(value = "/useApplication")
public String producer() {
OAuth2Operations operations = factory.getOAuthOperations();
OAuth2Parameters params = new OAuth2Parameters();
params.setRedirectUri("http://localhost:8080/forwardLogin");
params.setScope("email,public_profile");
String url = operations.buildAuthenticateUrl(params);
System.out.println("The URL is" + url);
return "redirect:" + url;
}
@RequestMapping(value = "/forwardLogin")
public ModelAndView prodducer(@RequestParam("code") String authorizationCode) {
OAuth2Operations operations = factory.getOAuthOperations();
AccessGrant accessToken = operations.exchangeForAccess(authorizationCode, "http://localhost:8080/forwardLogin",
null);
System.out.println("The Authorization code is : " + authorizationCode);
Connection<Facebook> connection = factory.createConnection(accessToken);
Facebook facebook = connection.getApi();
String[] fields = { "id", "email", "first_name", "last_name" };
User userProfile = facebook.fetchObject("me", User.class, fields);
ModelAndView model = new ModelAndView("home");
model.addObject("user", userProfile);
return model;
}
}


  • Create the “welcome.jsp” file which can be use as initial login page.
<%@taglib prefix="c" uri="http://java.sun.com/jsp/jstl/core"%>

<html>
<head>
<style>
h1 {color:blue;}
</style>
<title>welcome</title>
</head>
<body>
<h1 Align=center color=blue>Welcome to the OAuth demo with Facebook!</h1>
<br>
<div style="border: 1px solid #ccc; padding: 5px; margin-bottom: 20px;">
<h4>Click here to login with : <a href="/useApplication">Facebook</a> </h4>
     
</div>
</body>
</html>


  • Create the “home.jsp” file file which shows user details that has been retrieved using obtained Access token.
<html>
<head>
<style>
h1 {color:blue;}
</style>
<title>home</title>
</head>
<body>
<h1 Align=center >You have successfully logged in through Facebook.</h1>
<br>
<h3>Your Facebook ID            : ${user.getId()}</h3>
<h3>Your Facebook Email Address : ${user.getEmail()}</h3>
<h3>Your Facebook First Name    : ${user.getFirstName()}</h3>
<h3>Your Facebook Last Name     : ${user.getLastName()}</h3>
</body>

</html>


Now you can run the project through your IDE or as Jar file.

In order to run as jar, please use below steps,
1.      Goto project root directory.
2.      Build the project using "mvn package" command.
3.      Navigate to the “/target” directory.
4.      Run the "spring-boot-social-login-0.0.1-SNAPSHOT.jar" file using "java -jar spring-boot-social-login-0.0.1-SNAPSHOT.jar" command.

Once application successfully started, navigate to "http://localhost:8080" url with new browser window.

  • Click the login with Facebook link to authenticate through Facebook.


  • This will prompt the Facebook login page if you haven’t already logged in.


  • Once you logged in with valid credentials, you will be getting user consent page to grant permission.


  • After providing necessary permissions. Application will call the resource server (Facebook) to get user details by providing previously obtained Access token.  


You can find the sample source code from :  https://github.com/shanakaweerasinghe/SpringBoot_SocialLogin.git

Monday, March 6, 2017

Configure WSO2 Identity Server with OpenDJ

This blog post explains how to configure OpenDJ LDAP server as the primary userstore of WSO2 Identity Server.
I have used Identity Server 5.3.0 and OpenDJ 3.0.0 for this explanation.


Setting up OpenDJ :


  1. Download the OpenDJ server.  I have used latest Trial Edition which can be download from https://forgerock.org/opendj/
  2. Then navigate to the root directory of downloaded LDAP server and run "setup" script to configure the OpenDJ server. (If your environment is windows, run setup.bat file)
  3. Configure the OpenDJ based on your requirement. You can refer the steps shown below,
  • Server Settings,

  • Topology Options,

  • Directory Data,

  • Runtime Options,

  • Review,

  • Now we have successfully configured OpenDJ configuration. To launch the control panel of the OpenDJ LDAP server, you can click the "Launch Control Panel" button as in the following image. If not, you can start it by running "control-panel" script which can be found under <OpenDJ_Home>/bin directory. (for Windows users, this can be found under <OpenDJ_Home>/bat directory)

  • Please refer below images for more details about my OpenDJ LDAP configurations.


Configuring Identity Server :


  1. WSO2 Identity server has configured with ApacheDS embedded LDAP by default. So to configure external LDAP with same ports, we have to disable it. 
  2. We can disable the embedded LDAP by changing "EmbeddedLDAP" property to "false" on embedded-ldap.xml file which can be found under <IS_HOME>/repository/conf/identity directory.
  3. Then configure the user-mgt.xml file which can be found under <IS_HOME>/repository/conf directory as per the LDAP server configurations. (make sure to comment the existing user store manager configuration)
<UserStoreManager class="org.wso2.carbon.user.core.ldap.ReadWriteLDAPUserStoreManager">
            <Property name="TenantManager">org.wso2.carbon.user.core.tenant.CommonHybridLDAPTenantManager</Property>
            <Property name="ConnectionURL">ldap://localhost:1389</Property>
            <Property name="Disabled">false</Property>                      
            <Property name="ConnectionName">cn=TestServer</Property>
            <Property name="ConnectionPassword">root</Property>
            <Property name="passwordHashMethod">PLAIN_TEXT</Property>
            <Property name="UserNameListFilter">(objectClass=person)</Property>
            <Property name="UserEntryObjectClass">inetOrgPerson</Property>
            <Property name="UserSearchBase">ou=users,dc=shanaka,dc=com</Property>
            <Property name="UserNameSearchFilter">(&amp;(objectClass=person)(uid=?))</Property>
            <Property name="UserNameAttribute">uid</Property>
            <Property name="UsernameJavaRegEx">[a-zA-Z0-9._-|//]{3,30}$</Property>
            <Property name="UsernameJavaScriptRegEx">^[\S]{3,30}$</Property>
            <Property name="RolenameJavaScriptRegEx">^[\S]{3,30}$</Property>
            <Property name="RolenameJavaRegEx">[a-zA-Z0-9._-|//]{3,30}$</Property>
            <Property name="PasswordJavaScriptRegEx">^[\S]{5,30}$</Property>
            <Property name="ReadGroups">true</Property>
            <Property name="WriteGroups">true</Property>
            <Property name="EmptyRolesAllowed">false</Property>
            <Property name="GroupSearchBase">ou=groups,dc=shanaka,dc=com</Property>
            <Property name="GroupNameListFilter">(objectClass=groupOfUniqueNames)</Property>
            <Property name="GroupEntryObjectClass">groupOfUniqueNames</Property>
            <Property name="GroupNameSearchFilter">(&amp;(objectClass=groupOfUniqueNames)(cn=?))</Property>
            <Property name="GroupNameAttribute">cn</Property>
            <Property name="SharedGroupNameAttribute">cn</Property>
            <Property name="SharedGroupSearchBase">ou=SharedGroups,dc=example,dc=com</Property>
            <Property name="SharedGroupEntryObjectClass">groupOfUniqueNames</Property>
            <Property name="SharedGroupNameListFilter">(objectClass=groupOfUniqueNames)</Property>
            <Property name="SharedGroupNameSearchFilter">(&amp;(objectClass=groupOfUniqueNames)(cn=?))</Property>
            <Property name="SharedTenantNameListFilter">(objectClass=organizationalUnit)</Property>
            <Property name="SharedTenantNameAttribute">ou</Property>
            <Property name="SharedTenantObjectClass">organizationalUnit</Property>
            <Property name="MembershipAttribute">uniqueMember</Property>
            <Property name="UserRolesCacheEnabled">true</Property>
            <Property name="ReplaceEscapeCharactersAtUserLogin">true</Property>
            <Property name="MaxRoleNameListLength">100</Property>
            <Property name="MaxUserNameListLength">100</Property>
            <Property name="SCIMEnabled">false</Property>
        </UserStoreManager>


We have configured OpenJD as the primary userstore of Identity server. Now start the Identity Server.

According to the configuration that I have done under user-mgt.xml file, admin user has been added to the LDAP and admin role has been created in the very first startup of the server. If you have define an existing user as admin user, that user will be shown as admin user without adding new entry to LDAP. 
Note : Admin user of  the WSO2 Identity Server must be a user in that OpenDJ search base and that user who is configured as admin must be in the admin role.

To verify the configurations, I have added new user "shanaka" and new role "Manager" through the management console of Identity server. 


Hope this will helpful. Thank you.

Wednesday, October 12, 2016

WSO2 Identity Server with Google federated authenticator.

WSO2 Identity Server supports for social login feature such as Google, Facebook, Azure and etc. Once you configure Google as federated authenticator, Identity Server will facilitate to authenticate with your Google credential. So it is not required to have those user details within identity server user store. 

I'm using Identity Server 5.1.0 and travelocity sample web application for this demonstration. Also I'm testing this scenario with Google sub domain (i.e. wso2.com)

1. Download the identity server from [1].

2. You can configure travelocity sample web application by following the documentation [2]. If you have already deployed and configured service provider, you can ignore this step.

3. Register OAuth 2.0 Application in Google.
Here I'm configuring OAuth web application in Google by selecting OAuth Client ID. You can find more details form [3]. 


4. Create an OAuth 2.0 application in Google and generate the client id and secret from the application. Make sure to provide "Authorized redirect URI" as following, 
https://{hostname}:{port}/commonauth
According to the default configuration of the identity Server, redirect URI should be,
https://localhost:9443/commonauth


5. Log into Identity server Management Console and add new Identity provider by providing Identity Provider Name (I'm providing "wso2.com" as my IDP name). Then configure the Google authenticator as shown below. Make sure to add your Redirect Uri as the Callback Url and Client id and Secret which is generated from above Google application [1].


6. Now navigate to your service provider configuration and expand the Local & Outbound Authentication Configuration section. Under that, please select "Advanced Configuration". Once you select this, you will be able to add multi-step authentication or multiple authenticators within one step. For the moment, we are selecting basic authenticator & configured Google authenticator within step one as shown below.


7. Now we have done the basic configuration, so check the scenario now. You will be getting a login screen as shown below,


8. Once you select Google authenticator(in my scenario its "wso2.com") , you will be redirect to Google login page. If you successfully authenticate, you will be redirecting to the web application with federated user details. 


Hope this will helpful. Thanks you.


[1] http://wso2.com/products/identity-server/
[2] https://docs.wso2.com/display/IS510/Configuring+Single+Sign-On
[3] https://developers.google.com/identity/protocols/OpenIDConnect


Tuesday, January 5, 2016

Get a user profile for OAuth Token using JWT headers with WSO2 Identity Server


This blog will explain, how to retrieve user profile and view user's attributes using OAuth access token in WSO2 IS. I assume that reader is familiar with WSO2 identity server and if you need more help you can follow the documentation at http://docs.wso2.org/wiki/display/IS400/WSO2+Identity+Server+Documentation


1. First we need to enable JWT token generation in Identity Server. Goto IS_Home/repository/conf/identity.xml and make following attribute true. 

<AuthorizationContextTokenGeneration>
<Enabled>true</Enabled>
<TokenGeneratorImplClass>org.wso2.carbon.identity.oauth2.authcontext.
JWTTokenGenerator</TokenGeneratorImplClass>
<ClaimsRetrieverImplClass>org.wso2.carbon.identity.oauth2.authcontext.
DefaultClaimsRetriever</ClaimsRetrieverImplClass>
<ConsumerDialectURI>http://wso2.org/claims</ConsumerDialectURI>
<SignatureAlgorithm>SHA256withRSA</SignatureAlgorithm>
<AuthorizationContextTTL>15</AuthorizationContextTTL>
</AuthorizationContextTokenGeneration>


2. Enable Admin services in Identity Server. Open IS_HOME/repository/conf/carbon.xml and set HideAdminServiceWSDLs property to false.

<HideAdminServiceWSDLs>false</HideAdminServiceWSDLs> 


3. Then start the WSO2 Identity server.


4. Create a service provider with OAuth2. To create a sample SP, Login to the Identity Server management console. Goto Main > select Add under Service provider. Give a name for a SP and select register.
Goto Inbound Authentication Configuration > OAuth/OpenID Connect Configuration and select Configure.
Put a call back url and select add. 


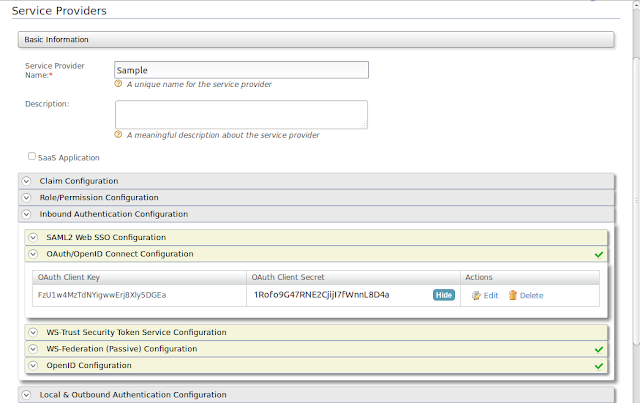
5. Then we can get the Client key and Client secret as show below.


6. Get the base64 encoded value for (client id:client secret) value. we can use an online tool like http://www.base64encode.org/


7. Use following CURL command to obtain the access token from the Identity Server.

curl -v -X POST -H "Authorization: Basic RnpVMXc0TXpUZE5ZaWd3d0VyajhYbHk1REdFYToxUm9mbzlHNDdSTkUyQ2ppakk3Zldubkw4RDRh" -H "Content-Type: application/x-www-form-urlencoded;charset=UTF-8" -k -d "grant_type=password&username=admin&password=admin" https://localhost:9443/oauth2/token


8. Create a SOAP web service project in soapUI using the following WSDL.


9. Then send the request and get the authorization context token which is encoded in base64 and delimited with "." character as shown below.


10. The Middle part will contain the user profile value and we can get it decoded using http://www.base64decode.org/


<ax2337:authorizationContextToken xsi:type="ax2337:OAuth2TokenValidationResponseDTO_AuthorizationContextTok
en">
<ax2337:tokenString>eyJ0eXAiOiJKV1QiLCJhbGciOiJTSEEyNTZ3aXRoUlNBIiwie
DV0IjoiTm1KbU9HVXhNelpsWWpNMlpEUmhOVFpsWVRBMVl6ZGhaVFJpT1dFM
E5XSTJNMkptT1RjMVpBIn0.eyJpc3MiOiJodHRwOi8vd3NvMi5vcmcvZ2F0ZXdheS
IsImV4cCI6MTQ1MTk3ODM2OTAzNiwiaHR0cDovL3dzbzIub3JnL2dhdGV3YXkvc
3Vic2NyaWJlciI6ImFkbWluIiwiaHR0cDovL3dzbzIub3JnL2dhdGV3YXkvYXBwbGlj
YXRpb25uYW1lIjoiU2FtcGxlIiwiaHR0cDovL3dzbzIub3JnL2dhdGV3YXkvZW5kdXN
lciI6ImFkbWluQGNhcmJvbi5zdXBlciIsICJodHRwOi8vd3NvMi5vcmcvY2xhaW1zL2
NvdW50cnkiOiJTcmlsYW5rYSIsICJodHRwOi8vd3NvMi5vcmcvY2xhaW1zL2VtYWls
YWRkcmVzcyI6ImFkbWluQHdzbzIuY29tIiwgImh0dHA6Ly93c28yLm9yZy9jbGFpb
XMvZnVsbG5hbWUiOiJhZG1pbiIsICJodHRwOi8vd3NvMi5vcmcvY2xhaW1zL2dpdm
VubmFtZSI6ImFkbWluIiwgImh0dHA6Ly93c28yLm9yZy9jbGFpbXMvaW0iOiIxcWF
6MndzeCIsICJodHRwOi8vd3NvMi5vcmcvY2xhaW1zL2xhc3RuYW1lIjoiYWRtaW4iL
CAiaHR0cDovL3dzbzIub3JnL2NsYWltcy9tb2JpbGUiOiIwNzc3Nzc4ODg4IiwgImh0
dHA6Ly93c28yLm9yZy9jbGFpbXMvb3JnYW5pemF0aW9uIjoiV1NPMiIsICJodHRw
Oi8vd3NvMi5vcmcvY2xhaW1zL3JvbGUiOiJhZG1pbixJbnRlcm5hbC9TYW1wbGUsS
W50ZXJuYWwvVHJhdmVsb2NpdHksSW50ZXJuYWwvZXZlcnlvbmUiLCAiaHR0cDo
vL3dzbzIub3JnL2NsYWltcy9zdHJlZXRhZGRyZXNzIjoiS29scGl0eSIsICJodHRwOi8v
d3NvMi5vcmcvY2xhaW1zL3RlbGVwaG9uZSI6IjA3MTIzNDU2NzgiLCAiaHR0cDov
L3dzbzIub3JnL2NsYWltcy91cmwiOiIyd3MxcWEifQ.jKYijQhFrWZRq9ddpxQ2dTGYj
VpCwOd8BOIpItW7v1pg-rbMdDGa14KcrWddL0nKUn1Wl3chUQsqtxaippUAPiSO0N7qqLbG1Qoe48COsAW
tFa_T7QBlzilwAffC3XAgdnqH20FcxK1_K3ttrvyfGR-Lhl7oyQsv8UcGsOSI6x0</ax2337:tokenString>
<ax2337:tokenType>JWT</ax2337:tokenType>
</ax2337:authorizationContextToken>


Hope this will helpful. Thank you.


Sunday, October 18, 2015

Deploy Service Provide in WSO2 Identity Server using Configuration Files.

Hi, we can deploy a Service provider in WSO2 Identity Server using,
        1. Management Console
        2. Admin Services.
        3. Configuration Files.

This blog will explain how to deploy a SP using configuration files.
I have used WSO2 IS 5.0.0 and Travelocity web app for this scenario.


Please follow the steps given below to create service provider using configuration files.

1.Goto <IS_HOME>/repository/conf/security/sso-idp-config.xml file and add the following configuration to it. This adds the travelocity application as a service provider.


<ServiceProvider>
<Issuer>travelocity.com</Issuer>
<AssertionConsumerService>http://localhost:8080/travelocity.com/home.jsp</AssertionConsumerService>
<SignAssertion>true</SignAssertion>
<SignResponse>true</SignResponse>
<EnableAttributeProfile>true</EnableAttributeProfile>
<IncludeAttributeByDefault>true</IncludeAttributeByDefault>
<EnableSingleLogout>true</EnableSingleLogout>
<Claims>
<Claim>http://wso2.org/claims/givenName</Claim>
</Claims>
<LogoutUrl></LogoutUrl>
<EnableAudienceRestriction>false</EnableAudienceRestriction>
<ConsumingServiceIndex>2104589</ConsumingServiceIndex>
</ServiceProvider>


2. Create a file named travelocity.com.xml in the <IS_HOME>/repository/conf/identity/service-providers directory.

3. Add the following configurations into the travelocity.com.xml file you created. This adds the necessary SAML configurations to the travelocity service provider.


<ServiceProvider>
<ApplicationID>3</ApplicationID>
<ApplicationName>travelocity.com</ApplicationName>
<Description>travelocity Service Provider</Description>
<IsSaaSApp>false</IsSaaSApp>
<InboundAuthenticationConfig>
<InboundAuthenticationRequestConfigs>
<InboundAuthenticationRequestConfig>
<InboundAuthKey>travelocity.com</InboundAuthKey>
<InboundAuthType>samlsso</InboundAuthType>
<Properties></Properties>
</InboundAuthenticationRequestConfig>
</InboundAuthenticationRequestConfigs>
</InboundAuthenticationConfig>
<LocalAndOutBoundAuthenticationConfig>
<AuthenticationSteps>
<AuthenticationStep>
<StepOrder>1</StepOrder>
<LocalAuthenticatorConfigs>
<LocalAuthenticatorConfig>
<Name>BasicAuthenticator</Name>
<DisplayName>basicauth</DisplayName>
<IsEnabled>true</IsEnabled>
</LocalAuthenticatorConfig>
</LocalAuthenticatorConfigs>
<FederatedIdentityProviders>
</FederatedIdentityProviders>
<SubjectStep>true</SubjectStep>
<AttributeStep>true</AttributeStep>
</AuthenticationStep>
</AuthenticationSteps>
</LocalAndOutBoundAuthenticationConfig>
<RequestPathAuthenticatorConfigs></RequestPathAuthenticatorConfigs>
<InboundProvisioningConfig></InboundProvisioningConfig>
<OutboundProvisioningConfig></OutboundProvisioningConfig>
<ClaimConfig>
<AlwaysSendMappedLocalSubjectId>true</AlwaysSendMappedLocalSubjectId>
</ClaimConfig>
<PermissionAndRoleConfig></PermissionAndRoleConfig>
</ServiceProvider>


4. Start the Identity server.

5. Use the instructions given under “Configuring the SSO web application” topic in https://docs.wso2.com/display/IS500/Configuring+Single+Sign-On+with+SAML+2.0#ConfiguringSingleSign-OnwithSAML2.0-ConfiguringtheSSOwebapplication to diploy travelocoty sample.


6. Run the sample app.


8. Since you need to use SAML2 for this Sample, click the first link, i.e., Click here to login with SAML from Identity ServerYou are redirected to the Identity Server for authentication.

9. Enter the default admin credentials (admin/admin).

10. Now you are logged in and you can see the home page of the travelocity.com app.