In this example, we will be creating SpringBoot sample application
which facilitate to authenticate through Facebook. In order to replicate the scenario,
I’m using OAuth2.0 Authorization Code grant type.
As first step, create a Facebook Application using developer account
and get the App Id and the App Secret.
- Login to Facebook developer account - Click here to login.
- Goto My Apps and create new application by providing Display name and Email address.

- You have to validated the security check if provided.

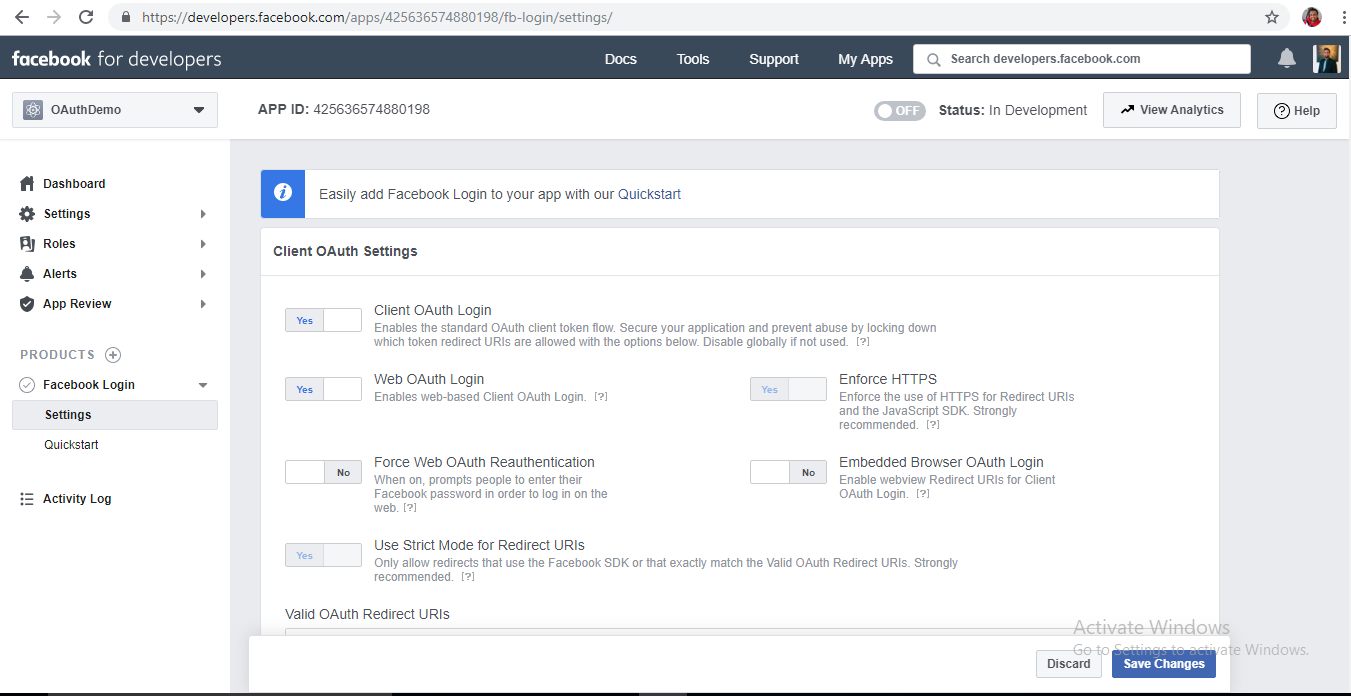
- Once application is created, navigate to Setting > basic to get App Id and App Secret.

- Also please verify “Client OAuth Login” and “Web OAuth Login” has enabled as shown below.
Now we have successfully configured Facebook application.
Then we need to create SpringBoot sample application as
shown below.

- Create SpringBoot initial project with mail class.
- Define the pom.xml as shown below. Make sure to add the “spring-social-facebook” dependency.
<?xml version="1.0" encoding="UTF-8"?>
<project xmlns="http://maven.apache.org/POM/4.0.0" xmlns:xsi="http://www.w3.org/2001/XMLSchema-instance"
xsi:schemaLocation="http://maven.apache.org/POM/4.0.0 http://maven.apache.org/xsd/maven-4.0.0.xsd">
<modelVersion>4.0.0</modelVersion>
<groupId>com.samle</groupId>
<artifactId>spring-boot-social-login</artifactId>
<version>0.0.1-SNAPSHOT</version>
<packaging>jar</packaging>
<name>spring-boot-social-login</name>
<description>Demo project for Spring Boot to Authenticate with Facebook OAuth</description>
<parent>
<groupId>org.springframework.boot</groupId>
<artifactId>spring-boot-starter-parent</artifactId>
<version>1.4.1.RELEASE</version>
<relativePath />
</parent>
<properties>
<project.build.sourceEncoding>UTF-8</project.build.sourceEncoding>
<project.reporting.outputEncoding>UTF-8</project.reporting.outputEncoding>
<java.version>1.8</java.version>
</properties>
<dependencies>
<dependency>
<groupId>org.springframework.boot</groupId>
<artifactId>spring-boot-starter-web</artifactId>
</dependency>
<dependency>
<groupId>org.springframework.boot</groupId>
<artifactId>spring-boot-starter-test</artifactId>
<scope>test</scope>
</dependency>
<dependency>
<groupId>org.apache.tomcat.embed</groupId>
<artifactId>tomcat-embed-jasper</artifactId>
</dependency>
<dependency>
<groupId>javax.servlet</groupId>
<artifactId>jstl</artifactId>
</dependency>
<dependency>
<groupId>org.springframework.social</groupId>
<artifactId>spring-social-facebook</artifactId>
<version>2.0.3.RELEASE</version>
</dependency>
</dependencies>
<build>
<plugins>
<plugin>
<groupId>org.springframework.boot</groupId>
<artifactId>spring-boot-maven-plugin</artifactId>
<executions>
<execution>
<goals>
<goal>repackage</goal>
</goals>
</execution>
</executions>
</plugin>
</plugins>
</build>
</project>
- Next, we will be defining the Controller. In this controller, we are using the FacebookConnectionFactory provided by the Spring Facebook Social. we are makeing OAuth call to Facebook to get the Auhtorization Code and then obtain the Access Token using this plugin.
NOTE : Make Sure to provide Facebook App ID and App Secret for
connection factory as shown below.
private FacebookConnectionFactory factory = new
FacebookConnectionFactory("<App ID>","<App
Secret>");
package com.samle.controllers;
import org.springframework.social.connect.Connection;
import org.springframework.social.facebook.api.Facebook;
import org.springframework.social.facebook.api.User;
import org.springframework.social.facebook.connect.FacebookConnectionFactory;
import org.springframework.social.oauth2.AccessGrant;
import org.springframework.social.oauth2.OAuth2Operations;
import org.springframework.social.oauth2.OAuth2Parameters;
import org.springframework.stereotype.Controller;
import org.springframework.web.bind.annotation.GetMapping;
import org.springframework.web.bind.annotation.RequestMapping;
import org.springframework.web.bind.annotation.RequestParam;
import org.springframework.web.servlet.ModelAndView;
@Controller
public class SocialFacebookController {
private FacebookConnectionFactory factory = new FacebookConnectionFactory("425636574880198",
"xxxxxxxxxxxxxxxxxx");
@RequestMapping("/")
public ModelAndView firstPage() {
return new ModelAndView("welcome");
}
@GetMapping(value = "/useApplication")
public String producer() {
OAuth2Operations operations = factory.getOAuthOperations();
OAuth2Parameters params = new OAuth2Parameters();
params.setRedirectUri("http://localhost:8080/forwardLogin");
params.setScope("email,public_profile");
String url = operations.buildAuthenticateUrl(params);
System.out.println("The URL is" + url);
return "redirect:" + url;
}
@RequestMapping(value = "/forwardLogin")
public ModelAndView prodducer(@RequestParam("code") String authorizationCode) {
OAuth2Operations operations = factory.getOAuthOperations();
AccessGrant accessToken = operations.exchangeForAccess(authorizationCode, "http://localhost:8080/forwardLogin",
null);
System.out.println("The Authorization code is : " + authorizationCode);
Connection<Facebook> connection = factory.createConnection(accessToken);
Facebook facebook = connection.getApi();
String[] fields = { "id", "email", "first_name", "last_name" };
User userProfile = facebook.fetchObject("me", User.class, fields);
ModelAndView model = new ModelAndView("home");
model.addObject("user", userProfile);
return model;
}
}
- Create the “welcome.jsp” file which can be use as initial login page.
<html>
<head>
<style>
h1 {color:blue;}
</style>
<title>welcome</title>
</head>
<body>
<h1 Align=center color=blue>Welcome to the OAuth demo with Facebook!</h1>
<br>
<div style="border: 1px solid #ccc; padding: 5px; margin-bottom: 20px;">
<h4>Click here to login with : <a href="/useApplication">Facebook</a> </h4>
</div>
</body>
</html>
- Create the “home.jsp” file file which shows user details that has been retrieved using obtained Access token.
<head>
<style>
h1 {color:blue;}
</style>
<title>home</title>
</head>
<body>
<h1 Align=center >You have successfully logged in through Facebook.</h1>
<br>
<h3>Your Facebook ID : ${user.getId()}</h3>
<h3>Your Facebook Email Address : ${user.getEmail()}</h3>
<h3>Your Facebook First Name : ${user.getFirstName()}</h3>
<h3>Your Facebook Last Name : ${user.getLastName()}</h3>
</body>
</html>
Now you can run the project through your IDE or as Jar file.
In order to run as jar, please use below steps,
1.
Goto project root directory.
2.
Build the project using "mvn package"
command.
3.
Navigate to the “/target” directory.
4. Run the "spring-boot-social-login-0.0.1-SNAPSHOT.jar"
file using "java -jar spring-boot-social-login-0.0.1-SNAPSHOT.jar"
command.
Once application successfully started, navigate to
"http://localhost:8080" url with new browser window.
- Click the login with Facebook link to authenticate through Facebook.

- This will prompt the Facebook login page if you haven’t already logged in.

- Once you logged in with valid credentials, you will be getting user consent page to grant permission.

- After providing necessary permissions. Application will call the resource server (Facebook) to get user details by providing previously obtained Access token.

You can find the sample source code from : https://github.com/shanakaweerasinghe/SpringBoot_SocialLogin.git